Using Private Packagist for Vendors, your customers can install packages with Composer using a unique URL and an authentication token. You can create customers and manage their package access on the vendor page in your organization.
Customers can use your packages in either an existing or a new Composer project.
Setting up a customer in Private Packagist
You can manage your customers and grant them access to packages on the vendor page in Private Packagist. To create your first customer click on "Create Customer" and fill out the form on the next page.
- Customer short name: The short name will be used in the Composer repository URL and the web UI URL where your customer sees packages they have access to and can download archives. Please be aware that changing the short name will change the web UI URL and the Composer repository URL and will therefore break existing Composer projects referring to the current URL. Your customers will then have to update their projects as explained in renaming the organization short name.
- Minimum accesible stability: This setting allows you to limit which versions of a package a customer has access to. More about that in the "Limit package access by minimum stability" section.
- Deliver source code URLs to customers through Composer: By default, Private Packagist removes source URLs for all packages assigned to a customer, e.g. for a git repository the URL to clone the repository, and customers are only able to install packages as archives. If your customer has access to your repositories and you want them to be able to install packages from source, e.g. via git clone, then you can enable the source code URL delivery to customers through Composer.
You can also create customers using our API through the API client with the following code snippet:
<?php

require_once __DIR__ . '/vendor/autoload.php';

$client = new \PrivatePackagist\ApiClient\Client();
$client->authenticate('api-token', 'api-secret');
$customer = $client->customers()->create(
    'Customer', // the customer name
    false, // does the customer have access to the version control source
    'customer', // the customer short name
    'beta' // the minimum accesible stability
);
Giving a customer access to a package
The packages section of a customer allows you to manage which packages and which versions of these packages a customer has access to.
Access to packages can also be granted via our API using our API client with the following code snippet:
<?php

require_once __DIR__ . '/vendor/autoload.php';

$customerId = 42;

$client = new \PrivatePackagist\ApiClient\Client();
$client->authenticate('api-token', 'api-secret');
$packages = [
    [
        'name' => 'acme/website',
        'versionConstraint' => '^1.0 | ^2.0', // optional version constraint to limit updates the customer receives
        'expirationDate' => (new \DateTime())->add(new \DateInterval('P1Y'))->format('c'), // optional expiration date to limit updates the customer receives
        'minimumAccessibleStability' => 'beta', // optional stability to restrict customers to specific package version stabilities like alpha, beta, or RC
    ],
];
$packages = $client->customers()->addOrEditPackages($customerId, $packages);
Private Packagist provides different ways on how you can limit which versions your customers have access to. If multiple limits are set then only versions that match all the constraints will be available to the customer. You can also choose to grant a customer access to all versions.
Limit package access by minimum stability
By default, your customers will have access to all versions of a package. For VCS repositories this includes all branches.
By setting a minimum accessible stability you can prevent customers from having access to versions that are not ready for
production use. Composer recognizes the following stabilities
(in order of stability): dev, alpha, beta, RC, and stable. If you have a VCS repository with the following versions:
dev-main, dev-feature-1, 1.0-a1, 1.0-b1, 1.0-rc1 and 1.0 then setting the minimum stability to RC will only
allow the customer to install versions 1.0-rc1 and 1.0.
Instead of setting this for every individual package you can also set this once for the customer which then gets applied to all packages the customer has access to unless otherwise specified.
Limit package access by version number
The version number limit allows you to use the same version constraints that you are already familiar with from your composer.json files.
This is useful if your customers buy a package license for acme/library version 1 and receive maintenance updates for
that version but will have to purchase a new license for a future version 2 of the package. You can achieve this by
restricting them to releases of the major version 1 with the constraint ^1.0.
Limit package access by publication date
If enabled then the customer will only receive access to versions that were or will be released before the date set. However, they keep access to those versions beyond the specified date. If you want to remove their access even to past versions, you need do delete the package from their list entirely.
This is useful if your customers buy a license from you for a certain timeframe e.g. a full year and therefore should get access to all versions that are released within that year.
Using vendor bundles to manage customer access to packages
Vendor bundles allow you to group packages and grant multiple customers access to the same packages. Instead of having to grant customers access to every package individually, you grant them access to a vendor bundle, and they will automatically receive access to all packages in the bundle. Adding additional packages to that bundle will then automatically grant all customers with access to the bundle access to these packages as well.
Vendor bundles can be managed on the Vendor Bundles section from the Vendor tab, and they can be assigned to customers on the bundle section of a customer.
Vendor bundles can also be created and customer access can be granted via our API using our API client with the following code snippet:
<?php

require_once __DIR__ . '/vendor/autoload.php';

$customerId = 42;

$client = new \PrivatePackagist\ApiClient\Client();
$client->authenticate('api-token', 'api-secret');

// Create a vendor bundle if not yet existing
$vendorBundle = $client->vendorBundles()->create('Acme Bundle');

// Add one or more packages to the vendor bundle
$packages = [
    [
        'name' => 'acme/website',
        'versionConstraint' => '^1.0 | ^2.0', // optional version constraint to limit updates the customer receives
        'minimumAccessibleStability' => 'beta', // optional stability to restrict customers to specific package version stabilities like alpha, beta, or RC
    ],
];
$packages = $client->vendorBundles()->packages()->addOrEditPackages($vendorBundle['id'], $packages);

// Grant a customer access to the vendor bundle and all its packages
$client->customers()->vendorBundles()->addOrEditVendorBundle(
   $customerId,
   $vendorBundle['id'],
   (new \DateTime('+1 year'))->format('c'), // optional expiration date to limit updates the customer receives
);
Adding a package to an existing Composer project
To install a package named "acme-company/api" into an existing project, the following steps are required:
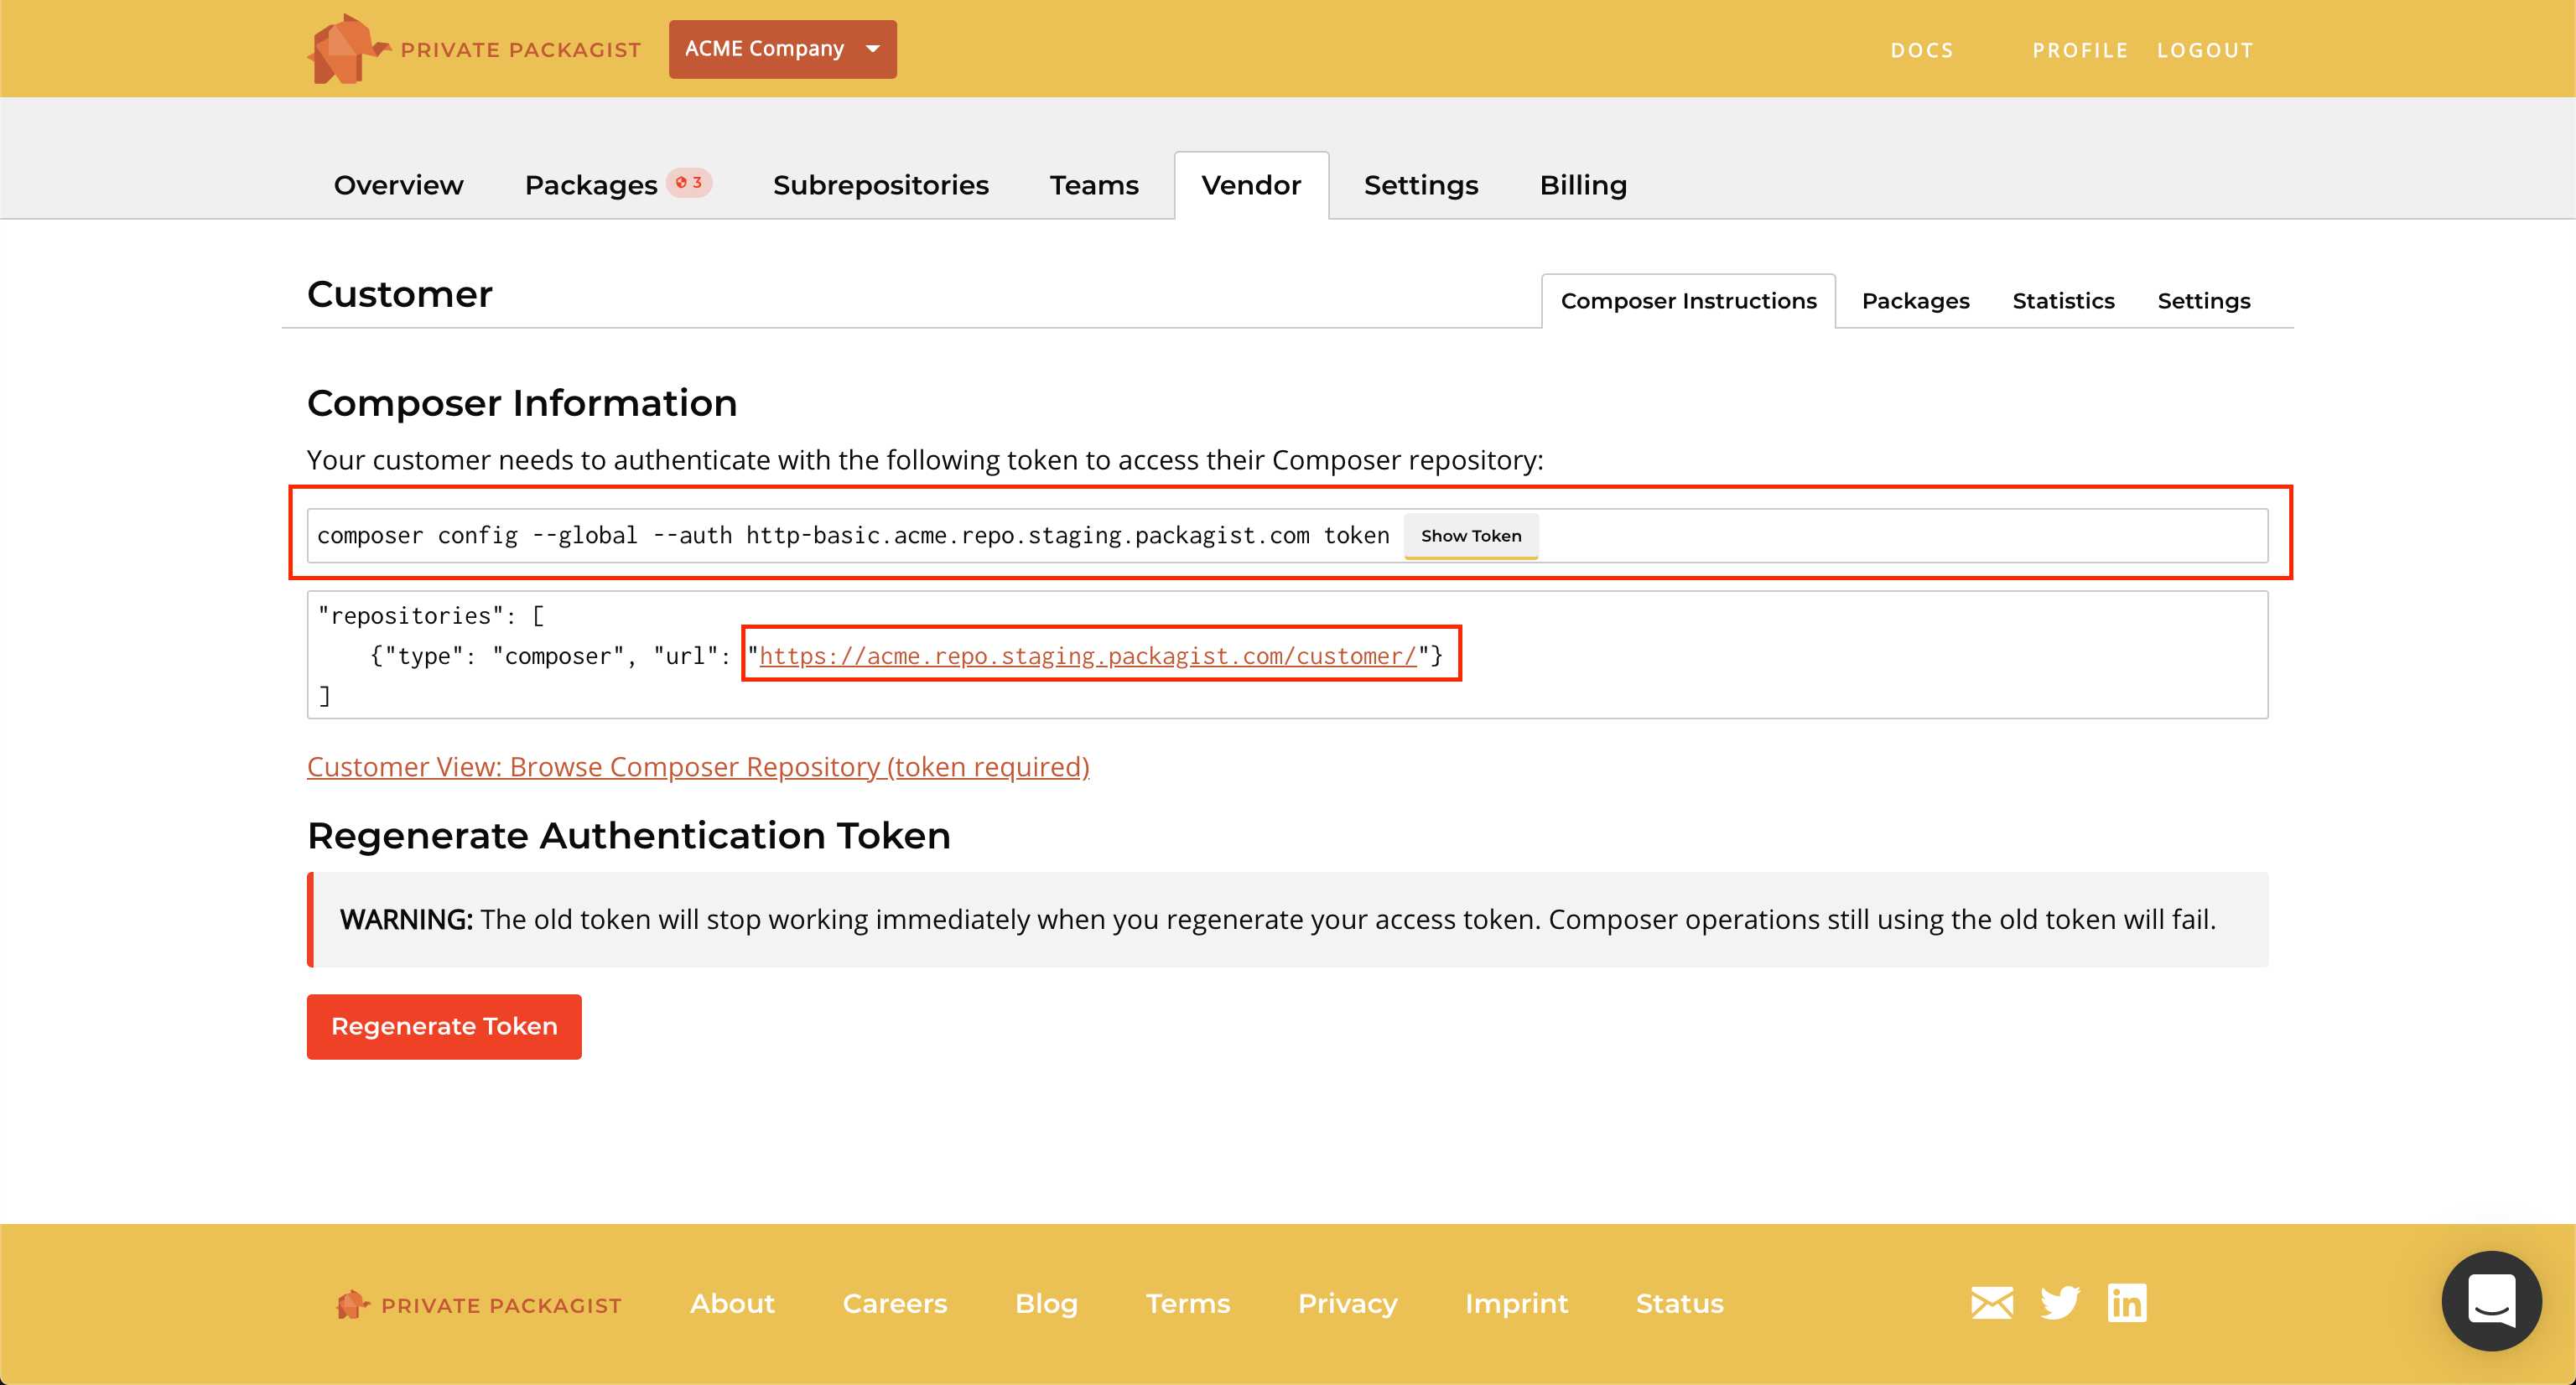
- Configure authentication: The command to set an authentication token is listed under the vendor tab on the customer's "Composer Instructions" page.
- Add the customer repository in the project's composer.json. The customer repository URL is listed under the vendor tab on the customer's "Composer Instructions" page. The project's composer.json should now have a new entry (assuming your organization is called
acmeand your customer is calledcustomer):"repositories": [ {"type": "composer", "url": "https://acme.repo.packagist.com/customer/"} ] - Install the new package by running
composer require acme-company/api
Starting a new Composer project
To set up a new project using your private packages, your customers can initialize an empty project with their unique Composer repository URL or copy a template project package from your Private Packagist repository.
composer init
To initialize a new empty Composer project the following steps are required:
- Configure authentication: The command to set an authentication token is listed under the vendor tab on the customer's "Composer Instructions" page.
- Run
composer init --name=my/website --repository=https://acme.repo.packagist.com/customer/. The customer specific URL is listed under the vendor tab on the customer's "Composer Instructions" page. Please replace "acme" with your own organization name, and "customer" with the customer's name. The package name "my/website" can be freely chosen by the customer.
After these steps composer require commands in the project can now access packages in your Private Packagist repository.
composer create-project
If you wish to provide a template package for new projects to your customers, the following steps show how to initialize a project from an example template package named acme/website. Your template project should not contain a Private Packagist repository URL in its composer.json, so the customer's own URL can be added while creating a new project.
- Configure authentication: The command to set an authentication token is listed under the vendor tab on the customer's "Composer Instructions" page.
- Run
composer create-project acme/website --add-repository --repository=https://acme.repo.packagist.com/customer/. The customer repository URL is listed under the vendor tab on the customer's "Composer Instructions" page.
Once the command is finished, the created composer.json file will contain the customer's Private Packagist repository URL:
 "repositories": [
     {"type": "composer", "url": "https://acme.repo.packagist.com/customer/"}
 ]
Important Note: If there is a composer.lock in your template project, the add-repository option will delete the lock file and run an update to generate a new one using the customer's personalized repository URL.
Start Free Trial
Login to create an organization and start your free trial!